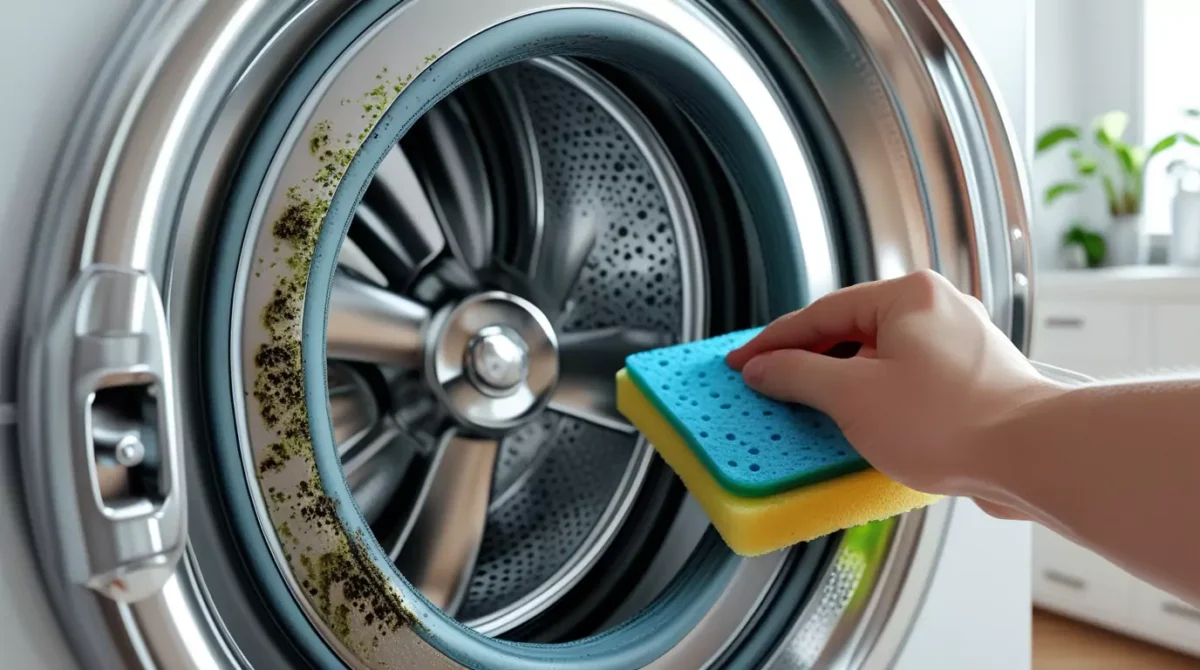
You open your washing machine and there it is.
Black, green, or grey gunk growing on that rubber seal around the door.
Your stomach drops because you know what it is.
Mold.
And now you’re wondering if your “clean” clothes have been getting a dose of spores with every wash.
Here’s the thing – learning how to remove mold from washing machine rubber seal isn’t rocket science.
But most people get it wrong.
They scrub once and think they’re done.
Then wonder why it comes back worse than before.
Why Your Washing Machine Rubber Seal Gets Moldy
Let me tell you what happened to my mate Sarah last month.
She called me panicking about her washing machine.
“There’s black stuff everywhere on the rubber bit!”
I went round and saw the classic signs.
Moisture trapped in the seal folds.
Soap residue feeding the mold.
Zero air circulation.
It’s like creating a perfect mold hotel.
The rubber seal (also called the door gasket) has those folds that trap water after every wash.
Add leftover detergent and fabric softener.
Mix in some lint and dirt.
Give it 24-48 hours in a warm, dark space.
Boom – mold city.
The Complete Method to Remove Mold from Washing Machine Rubber Seal
What You’ll Need
Before we start, grab these items:
- White vinegar (the cheap stuff works fine)
- Bicarbonate of soda
- Old toothbrush (one you’ll never use again)
- Microfibre cloths (at least 3)
- Rubber gloves
- Small bowl
- Torch or phone light
Step 1: Safety First
Put on those rubber gloves.
Open all windows if possible.
We’re dealing with mold spores here.
No point breathing them in whilst trying to get rid of them.
Step 2: Pull Back and Inspect the Seal
Here’s where most people mess up.
They only clean what they can see.
Gently pull back the rubber seal to expose all the hidden folds.
Use your torch to see everything.
You’ll probably find more mold than you expected.
Don’t panic – this is normal.
Step 3: The Vinegar Treatment
Mix equal parts white vinegar and warm water in your bowl.
Dip a cloth in the solution.
Start wiping from the top of the seal and work your way down.
Pull each fold open as you clean.
The vinegar kills mold and dissolves soap scum.
Change cloths when they get too grimy.
Step 4: The Stubborn Bits
Some mold laughs at vinegar.
That’s where the toothbrush comes in.
Dip it in your vinegar solution.
Scrub gently in circular motions on tough spots.
Don’t go mental with the pressure.
You’ll damage the rubber.
Step 5: The Bicarbonate Boost
For really stubborn mold, make a paste.
Mix 3 parts bicarbonate of soda with 1 part water.
Apply it to problem areas.
Let it sit for 15 minutes.
Then scrub gently with your toothbrush.
The bicarbonate lifts stains and kills remaining spores.
Step 6: The Final Rinse and Dry
Wipe everything down with a clean, damp cloth.
Remove all cleaning residue.
Then – and this is crucial – dry everything thoroughly.
Use a dry microfibre cloth.
Leave the washing machine door open for at least 2 hours.
Let air circulate through those seal folds.


Advanced Cleaning for Severe Mold Infestations
Sometimes the mold has thrown a proper house party.
Black stains everywhere.
Musty smell that makes you gag.
Here’s what to do:
The Bleach Method (Use Carefully)
Warning: Only use this method with proper ventilation.
Mix 1 part bleach with 10 parts water.
Apply with a cloth – never spray directly.
Let it sit for 5 minutes maximum.
Rinse thoroughly with clean water.
Never mix bleach with other cleaning products.
That’s how people end up in hospital.
The Professional-Grade Approach
For washing machines that smell like a swamp:
- Run an empty hot wash with 2 cups of white vinegar
- Follow with another empty wash using 1/2 cup bicarbonate of soda
- Then clean the seal using the method above
This tackles mold inside the machine too.
How to Prevent Mold from Coming Back
Cleaning mold once is easy.
Keeping it gone forever is the real skill.
After Every Wash
- Leave the door open for at least 30 minutes
- Wipe down the seal with a dry cloth
- Pull the detergent drawer out to air dry
Weekly Maintenance
- Quick wipe with vinegar solution every Sunday
- Check the seal folds for early signs of mold
- Run a maintenance wash with just hot water
Monthly Deep Clean
- Full seal inspection and clean
- Empty hot wash with white vinegar
- Clean the filter (it gets gross too)
Common Mistakes That Make Mold Worse
I’ve seen people make these errors repeatedly:
Using Too Much Detergent
More soap doesn’t mean cleaner clothes.
It means more residue for mold to feed on.
Use half the amount the bottle suggests.
Your clothes will be just as clean.
Closing the Door Immediately
I get it – you want your laundry room to look tidy.
But closing that door traps moisture.
Leave it open until everything’s dry.
Ignoring the Detergent Drawer
That drawer gets moldy too.
Pull it out after every wash.
Let it air dry.
Using Fabric Softener in Every Wash
Fabric softener leaves a film on everything.
Including your rubber seal.
Use it every 3rd or 4th wash maximum.


When to Call a Professional
Sometimes the mold wins.
If you’ve tried everything and it keeps coming back within days, you might have:
- Damaged seal that needs replacing
- Drainage issues causing standing water
- Ventilation problems in your laundry area
A washing machine repair person can diagnose these issues.
Different Types of Washing Machine Seals
Not all seals are created equal.
Front-Loading Machines
These have the classic rubber boot seal.
Most prone to mold because water pools in the bottom fold.
Use the full cleaning method above.
Top-Loading Machines
Fewer seal problems but still need attention.
Focus on the lid seal and any rubber components.
Older vs Newer Models
Newer machines often have improved drainage.
But older seals might be more fragile.
Be gentler with vintage machines.
Signs Your Seal Needs Replacing
Sometimes cleaning isn’t enough.
Look for:
- Tears or cracks in the rubber
- Permanent black stains that won’t budge
- Persistent musty smell even after deep cleaning
- Water leaking from the door area
A new seal costs £30-£80.
Much cheaper than a new washing machine.
Quick Emergency Cleaning Method
Guests coming over and your washing machine smells like a bog?
Here’s a 15-minute fix:
- Wipe visible mold with vinegar solution
- Sprinkle bicarbonate of soda in the drum
- Run a quick hot wash cycle
- Leave door open with a fan blowing air in
It won’t solve everything but kills the immediate smell.
The Economics of Mold Prevention
Let me break down the numbers.
Cleaning supplies for a year: £10
Time spent on prevention: 5 minutes weekly
Cost of ignoring it:
- New seal: £30-£80
- Professional cleaning: £50-£100
- New washing machine: £300-£800
Prevention wins every time.
Frequently Asked Questions
How often should I clean the rubber seal?
Weekly quick wipes, monthly deep cleans. If you live in a humid area or do lots of washing, increase the frequency.
Can I use household bleach on the seal?
Yes, but diluted and with proper ventilation. Never mix with other products. Rinse thoroughly afterwards.
Why does mold keep coming back?
Usually trapped moisture or too much detergent. Check you’re leaving the door open and using less soap.
Is mold in washing machines dangerous?
It can trigger allergies and respiratory issues. Some molds produce toxins. Clean it promptly and properly.
Can I prevent mold completely?
Almost completely with good habits. Leave doors open, wipe seals dry, and do monthly maintenance washes.
Should I replace my washing machine if there’s lots of mold?
Not usually. Most mold problems can be solved with proper cleaning and new habits. Replace the seal if it’s damaged.
Does fabric softener cause more mold?
Yes, it leaves residue that feeds mold. Use it sparingly and switch to white vinegar in the fabric softener compartment occasionally.
How do I know if the mold is inside the machine too?
Persistent smell even after seal cleaning usually means internal mold. Run vinegar and bicarbonate maintenance washes.
The Bottom Line
Removing mold from your washing machine rubber seal comes down to three things:
Consistent cleaning.
Proper drying.
Smart prevention.
Most people overthink it.
They buy expensive products and complicated gadgets.
But vinegar, bicarbonate of soda, and good habits beat everything else.
Your washing machine will last longer.
Your clothes will smell better.
And you won’t have to explain to visitors why your laundry room smells like a cave.
The key is starting today and sticking with it.
Because learning how to remove mold from washing machine rubber seal properly means never having to deal with this problem again.