You stare at your garage wall covered in tools and think “there has to be a better way.”
Your screwdrivers are mixed with your power drill bits.
Your hammer is next to your circular saw.
It’s chaos.
And when you need that one specific tool, you spend 10 minutes playing hide and seek.
Been there.
Done that.
Got the frustration.
Why Most People Get Tool Organization Wrong
Here’s what I see in 99% of garages:
People just hang stuff wherever there’s space.
No system.
No logic.
Just chaos disguised as organization.
The problem isn’t lack of space.
It’s lack of strategy.
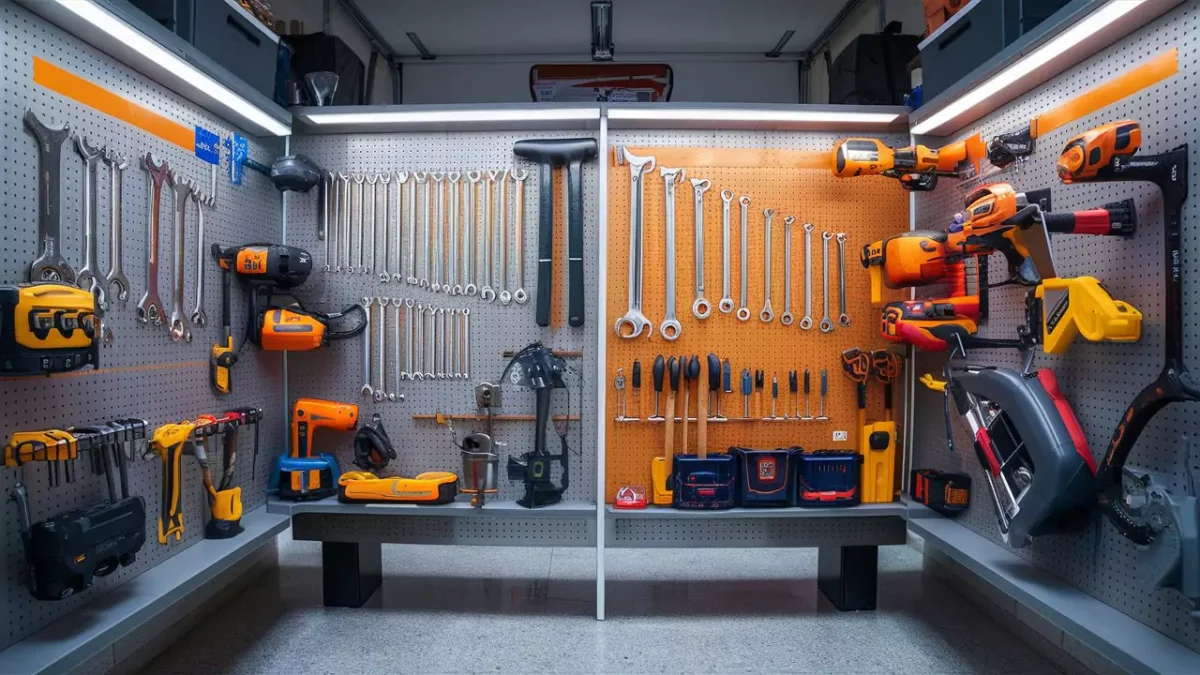
The Game-Changing Approach: Separate Hand Tools from Power Tools
Here’s the truth nobody tells you:
Your garage tool pegboard should be organized like a professional workshop.
Hand tools on one side.
Power tools on the other.
Simple.
Effective.
Life-changing.
Why This Method Works
Hand tools are your daily drivers:
- You grab them constantly
- They’re lightweight
- You use multiple ones per project
Power tools are your heavy hitters:
- You use them less frequently
- They need more support
- They have cords and accessories
Different tools.
Different needs.
Different zones.


Setting Up Your Hand Tool Zone
Location: Left side of your pegboard (if you’re right-handed)
Why left side?
You grab hand tools with your dominant hand.
You want easy access without reaching across your body.
Essential Hand Tools for Your Pegboard
Basic hand tools that belong here:
- Screwdrivers (flathead and Phillips)
- Pliers (needle-nose, standard, wire cutters)
- Wrenches (adjustable, combination sets)
- Hammers (claw, ball-peen)
- Measuring tools (tape measure, level, square)
- Utility knife
- Chisels
- Files and sandpaper
Hand Tool Organization Strategy
Group by function, not size.
Here’s how I do it:
Top row: Most-used tools (screwdrivers, pliers, hammer)
Middle row: Measuring and marking tools
Bottom row: Specialty hand tools and files
Pro tip: Outline each tool with a marker on the pegboard.
When tools go missing, you’ll know instantly.
Your kids will actually put tools back in the right spot.
Magic.
Setting Up Your Power Tool Zone
Location: Right side of your pegboard
Key difference: Power tools need heavy-duty support.
Those flimsy pegboard hooks won’t cut it.
You need serious hardware.
Power Tools That Work on Pegboards
Light power tools:
- Cordless drill
- Impact driver
- Orbital sander
- Jigsaw
- Rotary tool (Dremel)
Heavy power tools belong on shelves or the floor:
- Circular saw
- Miter saw
- Router
- Angle grinder
Power Tool Organization Strategy
Think about battery systems.
If you have all DeWalt tools, group them together.
Same with Milwaukee, Ryobi, or whatever brand you use.
Battery station setup:
- Mount battery chargers on the wall
- Create slots for spare batteries
- Keep everything in one zone
Cord management:
- Use cord wraps or velcro ties
- Mount a power strip nearby
- Keep extension cords organized
The Layout That Actually Works
Let me walk you through my setup.
Left side (hand tools):
Top shelf: Daily drivers
- 2 screwdrivers (most used sizes)
- Needle-nose pliers
- Wire cutters
- Adjustable wrench
Middle shelf: Measuring stuff
- Tape measure
- Level
- Speed square
- Pencils
Bottom shelf: Everything else
- Specialty screwdrivers
- Files
- Sandpaper
- Utility knife
Right side (power tools):
Top: Light cordless tools
- Drill
- Impact driver
- Flashlight
Middle: Batteries and chargers
- Battery charging station
- Spare batteries
- Battery tester
Bottom: Accessories
- Drill bits organized in cases
- Driver bits
- Sanding discs


Pegboard Accessories That Don’t Suck
Standard pegboard hooks are garbage.
They fall out.
They bend.
They break.
Here’s what actually works:
For hand tools:
- Locking pegboard hooks
- Magnetic tool holders
- Small bins for screws and fasteners
For power tools:
- Heavy-duty hooks rated for weight
- Tool holsters (like gun holsters but for drills)
- Shelf brackets for batteries and chargers
Common Mistakes That Kill Your System
Mistake #1: Mixing everything together
Keep hand tools separate from power tools.
Period.
Mistake #2: Not considering weight limits
That circular saw will rip your pegboard hooks right out of the wall.
Know your limits.
Mistake #3: Ignoring cord storage
Tangled cords are the enemy of good organization.
Plan for them.
Mistake #4: No designated spots
Every tool needs a home.
Outline it.
Label it.
Make it obvious.
Advanced Tips for Pro-Level Organization
The Shadow Board Method
Trace every tool on the pegboard background.
Paint the outlines in bright colors.
When a tool is missing, you see the shadow immediately.
Your spouse will know exactly where the hammer goes.
Your kids can’t claim they “didn’t know where it belonged.”
Frequency-Based Placement
Tools you use daily: Eye level, easy reach
Tools you use weekly: Upper and lower areas
Tools you use monthly: Furthest spots or storage bins
The 5S Method (Simplified)
Sort: Keep only what you use
Set in order: Everything has a designated spot
Shine: Keep tools clean (easier to spot problems)
Standardize: Make the system obvious to everyone
Sustain: Review and adjust monthly


Maintenance and Upgrades
Weekly: Put everything back in its designated spot
Monthly: Check for worn hooks or missing tools
Quarterly: Reorganize based on what you actually use
Yearly: Upgrade hooks, add new tools, remove unused ones
Tools and Materials You’ll Need
For the pegboard itself:
- 1/4 inch pegboard (better than 1/8 inch)
- 1×2 furring strips for wall mounting
- Heavy-duty screws and anchors
For organization:
- Locking pegboard hooks
- Tool holders and holsters
- Small bins and containers
- Permanent markers for outlining
- Labels
Installation tools:
- Drill
- Level
- Stud finder
- Measuring tape
Real-World Example: My Garage Transformation
I used to have tools scattered across three different areas.
Workbench drawers.
Random pegboard sections.
A toolbox that never stayed organized.
Finding anything took forever.
The change:
I dedicated one 4×8 pegboard to tools only.
Left half: Hand tools, organized by frequency of use.
Right half: Light power tools and their accessories.
Heavy power tools got their own shelf system.
Results:
Cut tool-finding time by 80%.
Projects move faster.
Less frustration.
Actually enjoy working in the garage now.
Frequently Asked Questions
How much weight can a pegboard hold?
Standard 1/4 inch pegboard can hold about 5-10 pounds per hook when properly mounted to studs.
For heavier tools, use thicker pegboard or shelf systems.
Should I paint my pegboard?
Yes, but use light colors.
White or light gray shows tool outlines better.
Dark colors hide the shadows.
What’s the best pegboard hook material?
Metal hooks last longer than plastic.
Locking hooks stay in place better than standard hooks.
Avoid cheap hooks – they break when you need them most.
How high should I mount my pegboard?
Bottom edge at 36 inches from the floor.
Top edge at 72 inches maximum.
This puts most tools at comfortable working height.
Can I use pegboard for all my tools?
No, heavy tools need shelf support.
Table saws, miter saws, and routers are too heavy for pegboard.
Use pegboard for tools under 10 pounds.
How do I organize drill bits and small accessories?
Clear plastic bins work best.
Label everything.
Group by size or type.
Mount bins on the pegboard for easy access.
The Bottom Line
Organizing your garage tool pegboard by hand versus power tools isn’t rocket science.
It’s about creating zones that make sense.
Hand tools in one area.
Power tools in another.
Everything has a home.
Everything has a purpose.
Start simple.
Add complexity as you go.
But start.
Your future self will thank you every time you grab exactly the tool you need without searching.
And that’s the real win: more time building, less time hunting for tools on your garage tool pegboard.