Your craft room looks like a tornado hit a craft store.
You spend more time looking for supplies than actually crafting.
And every time you want to start a project, you’re digging through boxes like you’re hunting for treasure.
I’ve been there too.
That’s exactly why clear acrylic drawer systems changed everything for me.
Why Your Current Storage System Isn’t Working
Most people make the same mistakes.
They buy random containers. They stuff everything in boxes. They think “out of sight, out of mind” works.
It doesn’t.
Here’s what actually happens:
- You forget what you own
- You buy duplicates
- You waste time searching
- You give up on projects before you start
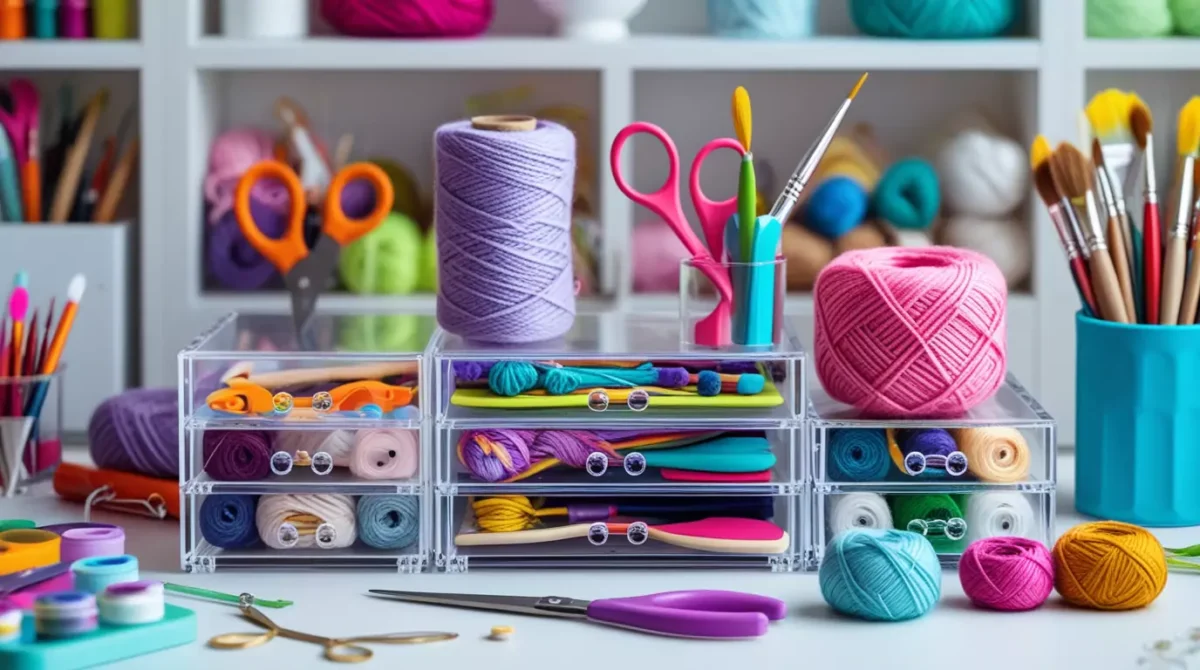
The Clear Acrylic Game Changer
Clear acrylic drawer systems solve every single one of these problems.
You see everything. You access everything. You remember what you have.
It’s that simple.

How I Set Up My Clear Acrylic Drawer System
Step 1: Empty Everything Out
First, dump it all out.
I know it looks scary.
But you can’t organize what you can’t see.
Put everything on a big table or the floor.
Step 2: Sort by Category
Create these piles:
- Paper supplies (cardstock, scrapbook paper, stickers)
- Writing tools (pens, markers, pencils)
- Cutting tools (scissors, craft knives, punches)
- Adhesives (glue, tape, double-sided tape)
- Embellishments (buttons, ribbons, sequins)
- Paints and inks (acrylic paints, ink pads, brushes)
Don’t overthink this part.
If something doesn’t fit perfectly in a category, just pick the closest one.
Step 3: Choose Your Drawer Sizes
Here’s where most people mess up.
They buy all the same size drawers.
That’s wrong.
You need different sizes for different supplies:
- Small drawers for buttons, beads, small embellishments
- Medium drawers for pens, brushes, scissors
- Large drawers for paper, fabric, bigger tools
Step 4: The Layout Strategy
Put the most-used items at eye level.
Heavy items go on the bottom. Light items go on top.
I keep my paper in the biggest bottom drawers. My everyday pens and scissors at eye level. My special occasion supplies up high.
Pro Tips That Actually Work
Label Everything (Even Though It’s Clear)
I know, I know.
You can see through the drawers.
But trust me on this.
When you’re in the middle of a project, you want to grab and go.
Labels save you those extra seconds of thinking.
The One-Inch Rule
Never fill a drawer more than one inch from the top.
Overstuffed drawers are just fancy boxes you can’t close.
Group Similar Colors Together
This is where the magic happens.
Put all your blue supplies in one area. All your reds in another.
When you’re working on a project, you’ll grab multiple items from the same color family.
Keep Frequently Used Items in Easy-Reach Drawers
My everyday supplies live in the middle section.
I can grab them without bending or reaching.
Special occasion supplies go up high or down low.
Common Mistakes to Avoid
Don’t Buy Cheap Acrylic
I learned this the hard way.
Cheap acrylic cracks. It scratches easily. The drawers stick.
Spend a little more upfront.
Your future self will thank you.
Don’t Ignore Drawer Dividers
Big empty drawers turn into junk drawers.
Use dividers to create sections.
Small containers work too.
Don’t Put Everything in Drawers
Some items are too big. Some you use too often.
Keep your cutting mat out. Keep your most-used scissors in a cup. Keep your current project supplies in a basket.


Setting Up Different Zones
The Daily Driver Zone
This is your bread and butter.
Scissors, pens, glue, tape, basic paper.
Put this at eye level in easy-reach drawers.
The Project Specific Zone
Scrapbooking supplies in one section. Card making in another. Kids’ crafts in a third.
Group by activity, not just by item type.
The Inspiration Zone
This is where you put the fun stuff.
Special papers you’re saving. Fancy ribbons. Unique embellishments.
Keep these visible but out of the way.
Maintenance Made Simple
The Five-Minute Rule
After every craft session, spend five minutes putting things back.
Not tomorrow. Not later. Right now.
Monthly Clean-Out
Once a month, go through each drawer.
Toss dried-up pens. Return borrowed items. Put things back where they belong.
The New Item Protocol
When you buy something new, immediately find its home.
Don’t just stuff it wherever.
If it doesn’t have a clear spot, maybe you don’t need it.
Budget-Friendly Alternatives
Start Small
You don’t need to buy a whole system at once.
Start with one section.
See how you like it.
Add more over time.
Mix and Match
Combine acrylic drawers with other storage.
Use mason jars for small items. Pegboards for frequently used tools. Baskets for works in progress.
DIY Dividers
Make your own dividers from cardboard.
Use small containers you already have.
You can always upgrade later.


Troubleshooting Common Problems
“I Can’t See Items in the Back”
Solution: Use shallow drawers or pull-out trays.
“Small Items Get Lost”
Solution: Add dividers or small containers inside drawers.
“I Forget What’s in Each Drawer”
Solution: Take photos and tape them to the front of each drawer.
The Psychology Behind Why This Works
When you can see everything, you use more of what you own.
When things have homes, you put them away.
When organization is simple, you maintain it.
Clear acrylic drawer systems hit all three points.
Real Talk: Is It Worth the Investment?
Here’s the truth.
Good acrylic storage costs money upfront.
But think about what you spend on:
- Buying duplicates because you can’t find things
- Storage containers that don’t work
- Time spent searching instead of creating
The system pays for itself.
Frequently Asked Questions (FAQs)
How many drawers do I need?
Start with 8-12 drawers for a basic setup.
You can always add more later.
What size drawers work best?
Mix of small (6″x9″), medium (9″x12″), and large (12″x15″).
Should I get drawers with handles?
Yes, if you have the budget.
No, if you’re watching costs – you can always add adhesive pulls.
How do I clean acrylic drawers?
Mild soap and water.
Never use harsh chemicals – they’ll cloud the plastic.
Can I stack different brands together?
Sometimes.
Measure carefully before buying.
What about humidity and temperature changes?
Good quality acrylic handles normal room conditions fine.
Avoid extreme heat or cold.
Making It Work for Your Space
Small Craft Rooms
Use vertical space.
Stack drawers high.
Use the backs of doors.
Shared Spaces
Choose neutral colors.
Keep everything contained.
Make it look intentional, not cluttery.
Kids’ Craft Areas
Lower heights.
Fewer small parts.
More visual cues and labels.
The Bottom Line
Clear acrylic drawer systems aren’t just storage – they’re a complete game changer for how you craft.
You’ll spend less time looking. You’ll use more of what you own. You’ll actually enjoy your craft space again.
Stop fighting with messy supply closets and random containers.
Get clear acrylic drawer systems and organize your craft supplies the right way.
Your creative projects (and your sanity) will thank you.