Your brick wall looks like it’s about to fall apart.
You walk by your house every day and see those loose bricks mocking you.
Maybe you’re thinking “Do I really need to drop $5,000 on a contractor?”
The answer is no.
Most loose exterior brick veneer problems are totally fixable without calling in the pros.
Why Your Brick Veneer Is Coming Loose (And It’s Not Your Fault)
Here’s the thing nobody tells you about brick veneer.
It’s not actually holding up your house.
Your brick veneer is basically decorative siding that’s attached to your real walls.
And just like any attachment, it can come loose over time.
The usual suspects:
- Water getting behind the bricks
- Mortar joints cracking from age
- House settling (totally normal)
- Temperature changes making everything expand and contract
- Poor installation from day one
I had a buddy who ignored loose bricks for two years.
Know what happened?
More bricks came loose.
Water got in.
His repair bill went from $200 to $2,000.
Don’t be that guy.
When You Can DIY vs When to Call the Pros
You can handle it yourself if:
- Only a few bricks are loose
- The wall isn’t bulging outward
- You’re not seeing cracks in your foundation
- The loose area is smaller than 3 feet wide
Call a professional if:
- The entire wall section is moving
- You see diagonal cracks running through multiple bricks
- There’s structural damage to your house
- You’re dealing with anything above the first floor
Safety first.
No home improvement project is worth a trip to the emergency room.


Tools and Materials You Actually Need
Stop overthinking this.
You don’t need a truck full of fancy tools.
Essential tools:
- Chisel (cold chisel works best)
- Hammer (2-3 lb is perfect)
- Mortar mixing paddle
- Pointing trowel
- Wire brush
- Safety glasses and dust mask
Materials you’ll need:
- Mortar mix (Type N is your go-to)
- Masonry adhesive (for quick fixes)
- Replacement bricks (if any are damaged)
That’s it.
Don’t let the hardware store sell you stuff you don’t need.
Step-by-Step: How to Fix Loose Exterior Brick Veneer
Step 1: Remove the Loose Bricks
This is where most people mess up.
They try to force things.
Here’s how to do it right:
Put on your safety gear.
Use your chisel and hammer to carefully remove old mortar around the loose brick.
Work slowly.
Mortar dust gets everywhere, so work on a calm day with no wind.
Wiggle the brick gently until it comes free.
Pro tip: Take a photo before you start removing anything.
You’ll thank me later when you’re trying to remember how everything fit together.
Step 2: Clean Everything Up
This step separates the amateurs from the pros.
Clean the brick:
- Brush off all old mortar
- Check for cracks or damage
- Replace if it’s broken (better safe than sorry)
Clean the cavity:
- Remove all loose mortar and debris
- Use compressed air if you have it
- The surface needs to be clean for new mortar to stick
Rushed cleaning = failed repair.
Take your time here.
Step 3: Mix Your Mortar
Don’t buy pre-mixed mortar.
It’s expensive and usually not the right consistency.
Here’s my mixing ratio:
- 1 part Portland cement
- 3 parts sand
- Add water slowly until it’s like thick peanut butter
Test it: The mortar should stick to your trowel when you flip it upside down.
Too wet? Add more dry mix.
Too dry? Add water one tablespoon at a time.
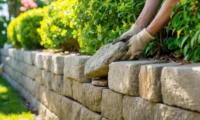
Step 4: Apply Mortar and Reset the Brick
Bottom and sides first:
- Apply mortar to the bottom of the cavity
- Put mortar on the sides where the brick will touch
- Don’t overdo it – you can always add more
Setting the brick:
- Push the brick into place firmly
- It should go in about 1/4 inch deeper than the final position
- Then pull it out slightly to create the right spacing
Level check:
- Use a level or just eyeball it against neighboring bricks
- Adjust now while the mortar is still workable
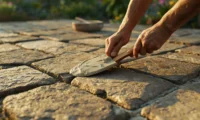
Step 5: Point the Joints
This is what makes your repair look professional.
Horizontal joints first:
- Pack mortar into the joint with your pointing trowel
- Fill it completely – no air pockets
- Smooth it to match surrounding joints
Vertical joints next:
- Same process
- Keep the joint width consistent with existing mortar lines
Finishing touch:
- Run your finger along the joint to create a slight concave shape
- This helps water run off instead of pooling
Quick Fixes That Actually Work
Sometimes you need a temporary solution.
Maybe it’s winter and you can’t do proper mortar work.
Masonry adhesive method:
- Clean the loose brick and cavity
- Apply construction adhesive to back of brick
- Press firmly into place
- Hold for 30 seconds
This isn’t permanent.
But it’ll buy you time until you can do it right.
Expanding foam trick:
- Only use this for very small gaps
- Spray foam behind loose brick
- Trim excess when dry
- Paint to match if visible
Again, temporary fix only.
Common Mistakes That’ll Cost You
Mistake #1: Using the wrong mortar
Not all mortar is the same.
Modern mortar is often harder than old mortar.
If your house is over 50 years old, you might need lime-based mortar instead of Portland cement.
Mistake #2: Working in bad weather
Don’t do mortar work when:
- Temperature is below 40°F or above 90°F
- It’s windy
- Rain is coming in the next 24 hours
- Humidity is super high
Mistake #3: Rushing the cure time
Fresh mortar needs 24-48 hours to cure properly.
Don’t mess with it during this time.
Mistake #4: Ignoring the root cause
If water caused your loose bricks, fix the water problem first.
Otherwise you’ll be doing this repair again next year.
Preventing Future Problems
Fix your gutters:
- Clean them twice a year
- Make sure downspouts direct water away from the house
- Replace damaged sections immediately
Seal your mortar joints:
- Check them every spring
- Touch up small cracks before they get big
- Use masonry sealer every few years
Watch your sprinklers:
- Don’t spray water directly on brick walls
- Constant moisture is brick veneer’s worst enemy
Annual inspection:
- Walk around your house every spring
- Look for loose bricks, cracked mortar, or staining
- Fix small problems before they become big problems
When to Consider Masonry Veneer Alternatives
Sometimes brick repair isn’t the best long-term solution.
Signs you might need a different approach:
- Constant repairs in the same area
- Widespread mortar failure
- Structural issues with the wall behind the veneer
Modern alternatives:
- Fiber cement siding that looks like brick
- Stone veneer panels (easier to install)
- Stucco over mesh (good for problem walls)
I’m not saying give up on your brick.
But sometimes cutting your losses makes financial sense.

The Real Cost of DIY vs Professional
DIY costs:
- Materials: $50-150 for small repairs
- Tools (if you don’t have them): $100-200
- Your time: 4-8 hours for a typical repair
Professional costs:
- Small repair: $300-800
- Large section: $1,500-5,000
- Full wall restoration: $10,000+
The math is pretty simple.
But remember – your time has value too.
And if you mess up a DIY repair, you might end up paying for professional work anyway.
FAQ: Everything Else You’re Wondering
How long will my repair last?
Done properly with good materials, 15-25 years easy. Maybe longer if you stay on top of maintenance.
Can I paint over the new mortar to match?
Yes, but wait at least 30 days for it to fully cure first. Use masonry paint, not regular house paint.
What if I can’t find matching bricks?
Salvage yards are goldmines for old brick. Or embrace the patch – sometimes the slight color difference adds character.
Is it normal for new mortar to be a different color?
Totally normal. It’ll weather and blend in over time. You can also add mortar colorant to match better.
How do I know if the problem is structural?
Look for diagonal cracks, walls that bow out, or doors/windows that suddenly don’t close properly. Those are red flags.
Can I do this work in winter?
Not recommended. Mortar doesn’t cure properly in freezing temps. Wait for spring unless it’s an emergency.
What’s the difference between repointing and rebuilding?
Repointing is just replacing the mortar joints. Rebuilding means taking down bricks and putting them back up.
Should I seal my brick after repair?
Generally no. Brick needs to breathe. Only seal if you have specific water problems, and use breathable masonry sealer.
Bottom Line: You’ve Got This
Look, fixing loose exterior brick veneer isn’t rocket science.
It’s methodical work that requires attention to detail.
Most homeowners can handle small repairs without breaking a sweat.
The key is being honest about your skill level and the scope of the problem.
Start small.
Learn the process.
Build confidence.
And remember – even if you mess up a small section, it’s not the end of the world.
You can always redo it or call in professional help.
But chances are, you’ll surprise yourself with how good your repair looks.
And every time you walk by that wall, you’ll think “I fixed that.”
That feeling is worth way more than the money you saved.
Ready to tackle that loose exterior brick veneer repair? Start with the smallest problem area and work your way up to bigger challenges.