Your stone wall is falling apart.
And you’re staring at it thinking “Great, now I need to hire some expensive mason.”
Wrong.
I’ve fixed three of these bad boys on my own property.
Saved thousands.
Here’s exactly how I did it.
Why Your Stone Wall is Coming Apart (And It’s Not Your Fault)
Most loose stone retaining walls fail for the same reasons:
- Poor drainage – Water gets behind the wall and pushes stones out
- No proper foundation – Someone just stacked rocks on dirt
- Freeze-thaw cycles – Water freezes, expands, and pops stones loose
- Root damage – Trees and plants push stones apart over time
The good news?
None of these require a professional to fix.
What You’ll Need (Don’t Overthink This)
Here’s my shopping list:
Basic tools:
- Shovel
- Level (4-foot works fine)
- Rubber mallet
- Work gloves
- Wheelbarrow or tarp
Materials:
- Crushed gravel (¾ inch)
- Sand
- Landscape fabric
- Stone dust or polymeric sand
- New stones (if some are cracked)
Total cost: Usually under $300.
Compare that to hiring a mason at $50-100 per hour.


Step 1: Take Everything Apart (Yes, Really)
This part sucks.
But you can’t fix a loose foundation by adding more stones on top.
Here’s what I do:
Remove all the loose stones first.
Stack them nearby – you’ll need them.
Take photos as you go.
Trust me on this one.
When you’re rebuilding, you’ll forget which stone went where.
Dig out all the old base material.
Go down until you hit solid, undisturbed soil.
For most retaining walls, that’s 6-12 inches deep.
Step 2: Build a Real Foundation (This is Where Most People Mess Up)
The foundation is everything.
Skip this and you’ll be back here in two years.
Dig your trench:
- Make it 6 inches wider than your wall
- Go 6-12 inches deep (deeper for taller walls)
- Level the bottom
Add your base layer:
- 4-6 inches of crushed gravel
- Compact it with a tamper (rent one if you don’t have it)
- Check level every few feet
The secret sauce: Add landscape fabric over the gravel.
This stops weeds from growing up through your wall later.
Most people skip this.
Don’t be most people.
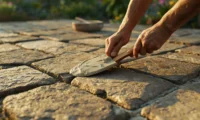
Step 3: Rebuild Your Wall (The Right Way This Time)
Start with your biggest, flattest stones as the base course.
My system:
- Place each stone level
- Check with your 4-foot level constantly
- Fill gaps with stone dust, not dirt
- Tap stones into place with rubber mallet
Pro tip I learned the hard way:
Tilt each stone slightly back toward the hill.
About 1 inch for every foot of height.
This makes the wall lean into the dirt it’s holding back.
Physics works for you instead of against you.


Step 4: Handle the Drainage (Skip This and You’re Screwed)
Water is what killed your wall the first time.
Don’t make the same mistake twice.
Behind the wall:
- Backfill with gravel, not dirt
- Install a French drain if water is really bad
- Slope everything away from the wall
Through the wall:
- Leave gaps every 6-8 feet for water to escape
- Don’t mortar these gaps
- Let water drain out, don’t trap it
I’ve seen people spend $5,000 rebuilding a wall.
Then skip the $200 drainage fix.
The wall fails again in three years.
Don’t be that person.
When You Actually Need a Professional
Look, I’m all about DIY.
But sometimes you need to call in the pros:
- Walls over 4 feet tall – These need engineering
- Structural damage to your house – Don’t mess around
- Retaining walls near property lines – Check local codes first
- You find underground utilities – Stop and call 811
How Much Money Will This Actually Save You?
Let me break down the real numbers:
DIY approach:
- Materials: $200-400
- Tool rental: $50-100
- Your time: 2-3 weekends
- Total: $250-500
Hiring a mason:
- Labor: $3,000-8,000
- Materials: $500-1,000
- Total: $3,500-9,000
You save $3,000-8,500.
That’s real money.


Common Mistakes That’ll Make You Start Over
I’ve made most of these.
Learn from my pain:
Rushing the foundation
- Spend 70% of your time on the base
- Everything else is easy if the foundation is right
Using the wrong backfill
- Dirt holds water
- Gravel drains water
- Use gravel
Ignoring the lean
- Straight walls fall over
- Leaning walls stay up
- Physics doesn’t care about your opinion
Skipping the compaction
- Loose base = loose wall
- Rent the tamper
- Your back will thank you later
FAQ: Everything Else You’re Wondering
How long will my DIY repair last?
Done right, 20-30 years minimum.
I’ve got walls I built 15 years ago that still look perfect.
Can I use concrete instead of stone?
You can.
But you lose the drainage benefits.
And it looks like crap.
Stick with stone.
What if I find more damage as I dig?
Take more photos.
Post them in local DIY groups.
Most problems have simple fixes.
Don’t panic and call a contractor yet.
Should I add rebar or wire mesh?
For dry-stacked stone walls? No.
The flexibility is actually a feature.
Rigid walls crack.
Flexible walls move and settle.
What about permits?
Depends on your area.
Most places don’t require permits for walls under 4 feet.
Check with your city first.
Better safe than sorry.
The Bottom Line on Fixing Loose Stone Retaining Walls
Here’s the truth nobody wants to tell you:
Most “professional” retaining wall jobs are just expensive ways to stack rocks.
You can learn to stack rocks.
The hard part is knowing WHY they fall down.
Now you know.
The secret is simple:
- Build a real foundation
- Handle the drainage
- Lean the wall back slightly
- Take your time
Do these four things right and your loose stone retaining wall will outlast the fancy engineered walls your neighbors paid $10,000 for.
And you’ll have $8,000 left over for something fun.