Your flagstone patio is starting to look like a disaster zone.
The mortar between those beautiful stones is cracking. Some pieces are literally falling out. And you’re wondering if you need to tear the whole thing apart.
Here’s the truth: You don’t.
I’ve been there. Staring at my own patio thinking I’d have to spend thousands on a complete redo. But there’s a way to fix loose flagstone patio mortar joints without starting from scratch.
Why Your Mortar Joints Are Failing (And It’s Not Your Fault)
Before we jump into fixes, let’s talk about why this happens.
Water is the enemy. It gets into tiny cracks. Freezes in winter. Expands. Breaks things apart.
Ground movement doesn’t help either. Your patio shifts slightly over time. The mortar can’t handle the stress. It cracks. Game over.
Poor initial installation is another culprit. Maybe the contractor rushed the job. Used the wrong mix. Didn’t prep properly.
Point is – this stuff happens to everyone.
What You’ll Need for This Landscape Hardscaping Repair
Here’s your shopping list:
Tools:
- Hammer and chisel (or oscillating multi-tool if you want to be fancy)
- Wire brush
- Shop vacuum
- Mixing bucket
- Pointing trowel
- Jointing tool (or butter knife works)
- Garden hose with spray nozzle
Materials:
- Pre-mixed mortar or sand/cement mix
- Bonding agent (liquid latex additive)
- Mortar colorant (if you want to match existing)
Don’t overthink the tools. You probably have half this stuff already.


Step 1: Remove the Loose Stuff (The Messy Part)
This is where you channel your inner demolition expert.
Remove all loose mortar. Use your hammer and chisel. Get aggressive with it. If a piece wiggles, it needs to go.
Clean out the joints completely. Use that wire brush. Get all the debris out. Vacuum everything.
Here’s the key: Go deeper than you think you need to. If you leave weak mortar behind, it’ll fail again. You want to get down to solid material.
I learned this the hard way. First time I did this, I was too gentle. Six months later, same problem.
Step 2: The Secret Cement Restoration Technique
This is where most people mess up.
Don’t just slap new mortar on top of old. That’s like putting a band-aid on a broken bone.
Prime the surface first. Mix your bonding agent with water. Brush it into the clean joints. This helps the new mortar stick properly.
Mix your mortar properly. Follow the bag instructions. Add colorant if you’re matching existing. Make it thick enough to hold its shape but workable.
The consistency should be like thick peanut butter.
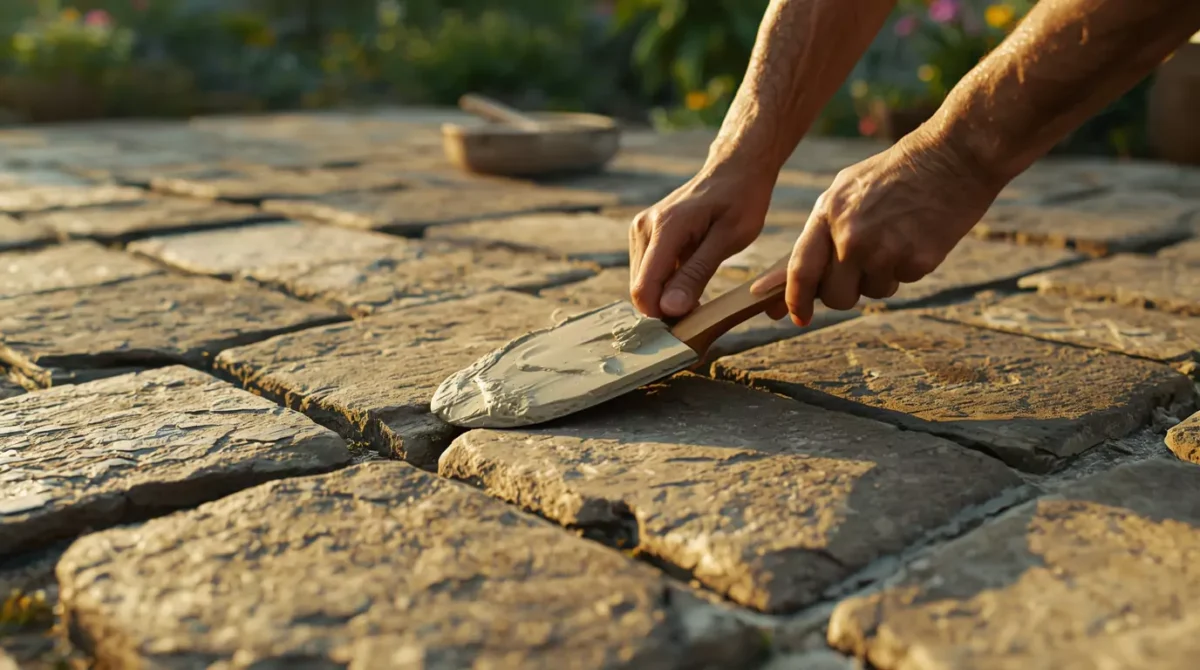
Step 3: Fill Those Joints Like a Pro
Work in small sections. Don’t try to do the whole patio at once. Mix only what you can use in 30 minutes.
Pack the mortar in tight. Use your pointing trowel. Really stuff it in there. No air pockets.
Tool the joints for a clean finish. Run your jointing tool along each joint. This compacts the mortar and gives a professional look.
Clean as you go. Mortar on flagstone is hard to remove once it dries. Keep a damp rag handy.

The Curing Process (Don’t Rush This)
Keep it damp for 24-48 hours. Mist with your garden hose. Don’t flood it. Just keep it from drying too fast.
Stay off the patio for at least 3 days. I know it’s tempting. But give the mortar time to cure properly.
Weather matters. Don’t do this work if rain is coming. Or if it’s super hot and windy. Both will mess with curing.
When This Method Won’t Work
Let’s be real. This approach isn’t magic.
If more than 30% of your joints are failing – you probably need complete repointing.
If the flagstones themselves are loose – bigger problem that needs professional help.
If water pools on your patio – fix drainage first or you’ll be back here next year.
Pro Tips That Make All the Difference
Mix small batches. Mortar starts setting up faster than you think.
Work in shade if possible. Hot sun makes everything harder.
Test your color match first. Mix a small batch with colorant. Let it dry completely. Make sure it matches before doing the whole job.
Don’t make joints too wide. They should be about 1/2 inch wide max. Wider joints are more likely to crack.


Cost Breakdown (Because You’re Wondering)
Here’s what this project typically costs:
- Materials: $50-100 (depending on patio size)
- Tool rental: $0-50 (if you need to rent anything)
- Your time: 1-2 weekends
Compare that to $15-25 per square foot for professional complete repointing.
On a 200 square foot patio, you’re looking at $3,000-5,000 for the full job.
This repair method saves serious money.
Maintenance to Prevent Future Problems
Seal your patio every 2-3 years. Use a good stone sealer. It keeps water out of tiny cracks.
Fix small cracks immediately. Don’t let them turn into big problems.
Keep joints clean. Remove weeds and debris regularly. They hold moisture and cause damage.
Check for settling. If sections start sinking, address it before the mortar fails.
FAQs
How long will this repair last?
With proper technique and good weather, 5-10 years easily. Maybe longer if you maintain it well.
Can I do this in cold weather?
Not recommended below 40°F. Mortar won’t cure properly and will fail.
What if I can’t match the original mortar color?
Consider repointing the entire patio with new color. It’ll look intentional instead of patchy.
Should I use polymeric sand instead?
Polymeric sand works for narrow joints on pavers. For flagstone with wide joints, proper mortar is better.
How do I know if the repair is working?
Wait for the first freeze-thaw cycle. If the mortar holds through winter, you did it right.
Can I walk on it while it’s curing?
Avoid it for at least 24 hours. Full cure takes 28 days but you can use it gently after 3-7 days.
The Bottom Line
Fixing loose flagstone patio mortar joints without complete repointing is totally doable.
You don’t need to be a contractor. You don’t need fancy tools. You just need to follow the process and be patient.
I’ve used this exact method on three different patios. Each one lasted years longer than I expected.
The key is good prep work and not rushing the cure.
Take your time. Do it right. And you’ll have a solid patio that looks professional.
Your neighbors will think you hired someone.
And you’ll know you saved thousands doing this landscape hardscaping repair yourself.