“Can I really build a decent garden bed without spending a fortune?”
That’s what I asked myself when I stared at my sad, rocky backyard last spring.
Store-bought raised beds cost $200-500. Crazy expensive.
But then I discovered the pallet hack.
Why Everyone’s Going Crazy for Pallet Garden Beds
Here’s the deal.
Free pallets are everywhere. Behind stores, warehouses, construction sites.
One pallet = instant garden bed walls. No complicated cuts. No expensive lumber.
I built my first one in 2 hours. Total cost: $15 for screws and landscape fabric.
What You’ll Actually Need (The Real List)
Materials:
- 2-3 wooden pallets (free from most businesses)
- Box of 3-inch wood screws
- Landscape fabric or cardboard
- Garden soil (about 10-15 bags)
- Basic drill
Tools:
- Drill with bits
- Level (or phone app)
- Measuring tape
- Work gloves
That’s it. No fancy tools. No engineering degree required.

Step 1: Hunt Down Your Free Pallets
Call local businesses first. “Hey, do you have any pallets I can take off your hands?”
Best places to check:
- Garden centers
- Appliance stores
- Furniture stores
- Small warehouses
Avoid these pallets:
- Anything marked “MB” (chemical treated)
- Cracked or rotting wood
- Weird stains or smells
Look for “HT” markings. Heat treated = safe for gardens.
Step 2: Pick Your Spot Like a Pro
I learned this the hard way.
My first bed went in a shady corner. Plants grew like they were depressed.
Choose a spot with:
- 6-8 hours of direct sunlight
- Level ground (or close to it)
- Easy access to water
- Away from big trees (they steal nutrients)
Step 3: Prep Your Ground (Don’t Skip This)
Clear the grass and weeds. Rake it level. Lay down cardboard or landscape fabric.
This stops weeds from growing up through your soil. Trust me on this one.

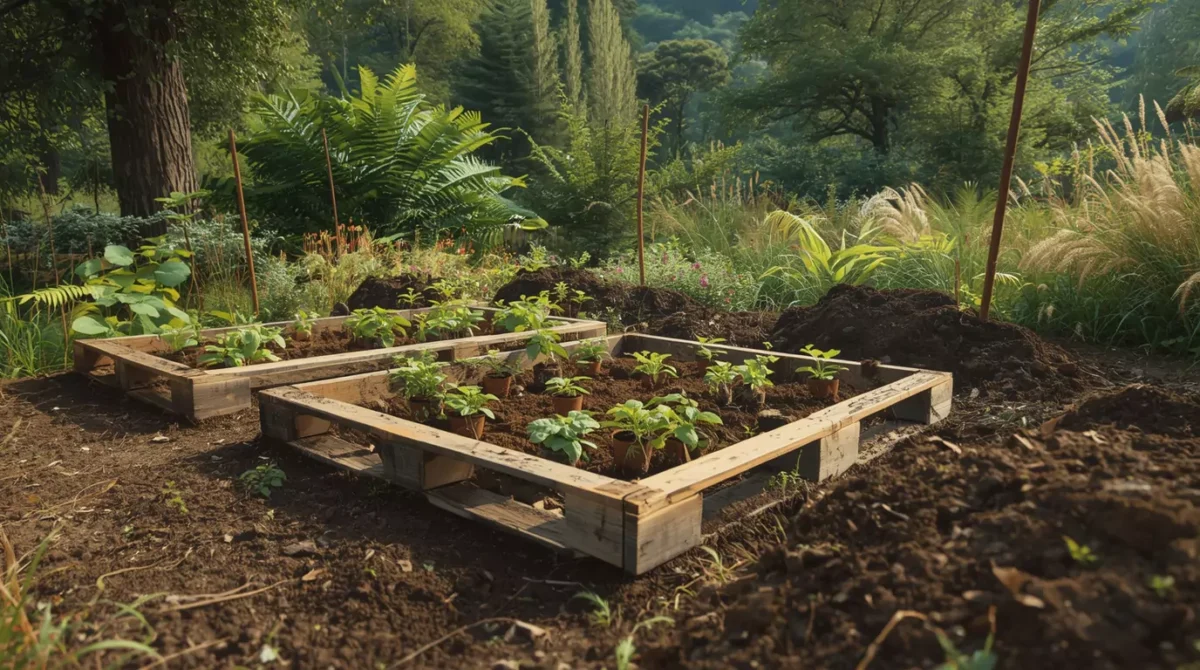
Step 4: Build Your Box (The Fun Part)
For a simple rectangle:
Stand two pallets on their sides. These become your long walls.
Cut a third pallet in half. These become your short walls.
Drill the corners together with 3-inch screws. 3 screws per corner minimum.
Pro tip: Pre-drill holes to prevent splitting.
Step 5: Level Check (Because Crooked Beds Look Terrible)
Use your level on all four sides. Add soil under low spots. Remove soil from high spots.
A wobbly bed drains weird. Plants hate weird drainage.
Step 6: Fill It Up Right
Layer it like this:
- Cardboard on bottom (blocks weeds)
- Coarse stuff (small branches, leaves)
- Garden soil mixed with compost
- Top layer of quality potting soil
Fill to about 1 inch from the top. Soil will settle over time.
Common Mistakes That’ll Drive You Nuts
Using the wrong soil. Don’t fill it with dirt from your yard. It compacts like concrete.
Making it too wide. Keep it under 4 feet wide. You need to reach the middle without stepping in it.
Forgetting drainage. Drill a few holes in the bottom if water pools.
Placing it wrong. Move it now, not after you fill it with 500 pounds of soil.
How Much Will This Actually Cost You?
My real numbers:
- Pallets: Free
- Screws and hardware: $12
- Landscape fabric: $8
- Soil (12 bags): $48
- Total: $68
Compare that to a $300 cedar bed from the store.
Making It Look Less “Pallet-y”
Look, pallets aren’t winning beauty contests.
But here’s what I did:
- Sanded rough edges
- Stained with outdoor wood stain
- Added corner caps from old fence posts
Suddenly it looked intentional. Not like I raided a warehouse.
What to Plant First (Start Easy)
Beginner winners:
- Lettuce (grows fast, hard to kill)
- Radishes (ready in 30 days)
- Green onions (cut and regrow forever)
- Spinach (loves cool weather)
Avoid these your first season:
- Tomatoes (need support and care)
- Peppers (picky about temperature)
- Anything that says “challenging” on the seed packet
Maintenance That Actually Matters
Every few weeks:
- Check for loose screws
- Pull big weeds
- Water when soil feels dry 2 inches down
Once a season:
- Add compost on top
- Replace any rotting boards
- Tighten everything up
That’s it. No daily fussing required.
When This Method Doesn’t Work
Skip pallets if:
- You’re in a fancy neighborhood with strict rules
- You want something permanent (15+ years)
- You’re growing root vegetables that need deep soil
- You can’t find safe, untreated pallets
Troubleshooting Real Problems
“My pallets are falling apart.” Use longer screws. Add metal brackets at corners. Check if the wood was already rotting.
“Water pools in the corners.” Drill drainage holes. Add gravel at the bottom. Check if your ground is level.
“Plants look sad and yellow.” Probably soil drainage issues. Mix in more compost and perlite.
Scaling Up (Because You’ll Want More)
Start with one bed. See how you like gardening.
Then add more in a line. Same height, same width. Looks organized, not random.
I started with one 4×4 bed. Now I have six. Same basic method for all of them.
FAQ: The Stuff Everyone Actually Asks
Are pallets safe for growing food?
Yes, if marked “HT” (heat treated). Avoid “MB” (chemical treated) pallets completely.
Can I use any size pallet?
Standard pallets (48″ x 40″) work best. Weird sizes get complicated fast.
How long do pallet garden beds last?
3-5 years typically. Weather and wood quality matter a lot.
Do I need to line the inside with plastic?
No. Plastic traps water and rots the wood faster. Use landscape fabric on the ground only.
What if I can’t find free pallets?
Check Facebook Marketplace. People sell them for $5-10 each.
How deep should my pallet garden bed be?
Most veggies need 6-8 inches minimum. Deeper is better for root vegetables.
The Bottom Line on Building a Simple Raised Garden Bed with Pallets
You don’t need carpentry skills. You don’t need expensive tools. You definitely don’t need to spend hundreds on fancy cedar beds.
Two hours of work. Under $70 in materials. Fresh vegetables all season.
I wish I’d started building simple raised garden beds with pallets years ago instead of overthinking it.
Stop researching. Find some pallets. Build the thing.
Your future self (and your grocery bill) will thank you.