Create Zoom Account Now: Easy Steps for PC/Laptop
In the fast-paced digital era, online communication has become an integral part of our lives. Whether it’s for business meetings, virtual classes, or social gatherings, having a reliable video conferencing platform is essential.
Zoom, a widely-used video conferencing tool, has gained immense popularity for its user-friendly interface and robust features. In this comprehensive guide, we will walk you through the step-by-step process of creating a Zoom account on your PC or laptop.
Importance of Zoom
Before we dive into the account creation process, let’s briefly explore why Zoom has become the go-to platform for virtual meetings and collaborations.
Zoom offers high-quality video and audio capabilities, making it ideal for professional meetings, remote work, and educational purposes. Its versatility allows users to host webinars, conduct virtual events, and connect with people from around the world seamlessly.
System Requirements
To ensure a smooth Zoom experience on your PC or laptop, it’s crucial to meet the system requirements. Before creating your Zoom account, make sure your device has the necessary specifications.
Zoom is compatible with both Windows and macOS operating systems. For Windows users, Windows 7 or later is recommended, while macOS users should have macOS X Yosemite 10.10 or later.
Additionally, a stable internet connection, a webcam, and a microphone are essential for optimal performance.


Downloading the Zoom Application
To create a Zoom account on your PC or laptop, you need to download the Zoom application. Follow these steps to get started:
Step 1: Open your preferred web browser and navigate to the official Zoom website.
Step 2: Click on the “Sign Up, It’s Free” button to initiate the account creation process.
Step 3: On the next page, enter your email address and click on “Sign Up.”
Step 4: Zoom will send a confirmation email to the provided address. Open your email inbox and click on the verification link.
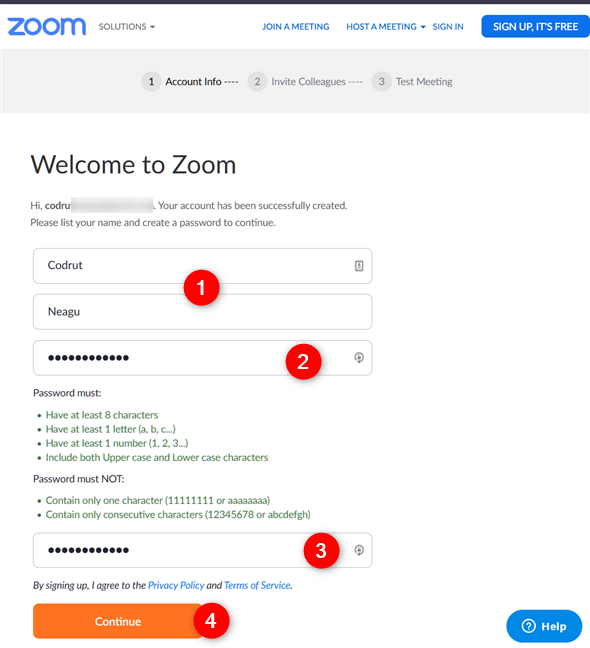
Step 5: Once your email is verified, you will be redirected to the Zoom website. Complete the required fields, including your first and last name, and set a password for your account.
Step 6: Click on “Sign Up” to proceed.
Step 7: Download the Zoom application for your operating system (Windows or macOS) by clicking on the respective download link.
Step 8: Run the downloaded installer file and follow the on-screen instructions to install the Zoom application on your PC or laptop.
Creating a Zoom Account
Now that you have downloaded and installed the Zoom application, it’s time to create your Zoom account. Follow these steps:
Step 1: Open the Zoom application on your PC or laptop.
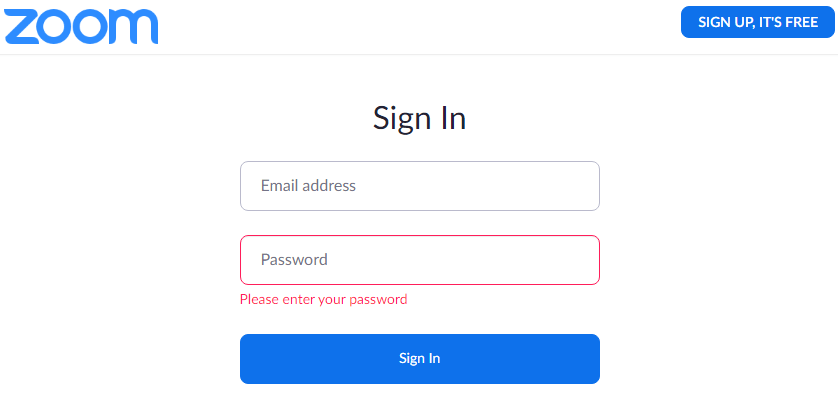
Step 2: Click on the “Sign Up” or “Sign In” button, depending on whether you already have an account. Since you are creating a new account, click on “Sign Up.”
Step 3: Enter the email address you used during the account creation process on the Zoom website and click on “Next.”
Step 4: Fill in your first and last name, create a username, and set a password for your Zoom account.
Step 5: Click on “Continue” to proceed to the next step.
Step 6: Zoom will prompt you to invite colleagues or friends to join. You can skip this step for now by clicking on “Skip this step” at the bottom of the page.
Step 7: Your Zoom account is now successfully created. You will receive a confirmation email with additional information about your account.
Configuring Zoom Settings
Once your Zoom account is set up, it’s essential to configure your settings for a personalized and secure experience. Explore the following settings to tailor Zoom to your preferences:
- Profile Settings:
- Navigate to the Zoom website and log in to your account.
- Click on your profile picture in the top right corner and select “Settings.”
- Update your profile information, including your profile picture and personal details.
- Meeting Settings:
- In the “Settings” menu, go to the “Meeting” tab to customize various meeting options.
- Set default meeting settings, such as enabling or disabling video, muting participants upon entry, and allowing or restricting screen sharing.
- Security Settings:
- Under the “Settings” menu, go to the “Security” tab to manage security-related options.
- Familiarize yourself with features like waiting rooms, password protection, and the ability to lock meetings to ensure secure virtual gatherings.
- Audio and Video Settings:
- Adjust your audio and video settings by clicking on the “Audio” and “Video” tabs in the “Settings” menu.
- Test your microphone and webcam to ensure they are functioning correctly.
- Notification Settings:
- Customize notification preferences under the “Settings” menu to control how you receive alerts for upcoming meetings, chat messages, and other notifications.

Joining and Hosting Zoom Meetings
Now that your Zoom account is configured, let’s explore how to join and host meetings on your PC or laptop.
Joining a Zoom Meeting:
Step 1: Open the Zoom application on your device.
Step 2: Click on the “Join” button.
Step 3: Enter the Meeting ID provided by the host.
Step 4: If required, enter the meeting password.
Step 5: Click on “Join Meeting.”
You are now connected to the Zoom meeting and can interact with other participants.
Hosting a Zoom Meeting:
Step 1: Open the Zoom application on your device.
Step 2: Click on the “Host a Meeting” option.
Step 3: Choose whether to start a video or audio-only meeting.
Step 4: Configure meeting settings, such as enabling or disabling video for participants.
Step 5: Click on “Start Meeting.”
Your Zoom meeting is now live, and participants can join using the Meeting ID and password if applicable.
Exploring Advanced Zoom Features
Zoom offers a plethora of advanced features to enhance your virtual meetings and collaborations. Let’s delve into some of these features:
- Breakout Rooms:
- Breakout rooms allow hosts to divide participants into smaller groups for focused discussions or activities.
- To use this feature, click on the “Breakout Rooms” option during a meeting and assign participants to different rooms.
- Virtual Backgrounds:
- Spice up your video calls by using virtual backgrounds.
- In the meeting controls, click on the arrow next to “Stop Video” and select “Choose Virtual Background” to select or upload an image.
- Recording Meetings:
- Zoom allows you to record your meetings for future reference.
- Click on the “Record” button in the meeting controls, and Zoom will save the recording to your device.
- Screen Sharing:
- Facilitate presentations and collaborative work by utilizing the screen sharing feature.
- Click on the “Share Screen” option in the meeting controls to share your entire screen or specific applications.
- Zoom Chat:
- Communicate with participants through the Zoom chat feature.
- Click on the “Chat” button to send messages to individuals or the entire group during a meeting.
- Polls:
- Engage participants by conducting polls during your Zoom meetings.
- Click on the “Polls” option in the meeting controls and create polls to gather feedback or opinions.
Troubleshooting Common Issues
Despite its user-friendly interface, users may encounter issues while using Zoom. Here are some common problems and their solutions:
- Audio and Video Issues:
- Ensure that your microphone and webcam are properly connected and selected in the Zoom settings.
- Test your audio and video before joining a meeting to identify and resolve any issues.
- Connectivity Problems:
- If you experience connectivity issues, check your internet connection’s stability.
- Consider switching to a wired connection or relocating to an area with a stronger Wi-Fi signal.
- Zoom Crashes:
- Update your Zoom application to the latest version to fix potential bugs.
- Close unnecessary applications running in the background to free up system resources.
- Meeting ID and Password Errors:
- Double-check the Meeting ID and password to ensure accuracy.
- If you are still unable to join, contact the meeting host for assistance.
- Audio Echo:
- If participants experience audio echo, ask them to use headphones or mute their microphones when not speaking.
- Adjust your audio settings to minimize feedback.


Security Best Practices
As virtual meetings become more prevalent, ensuring the security of your Zoom sessions is paramount. Follow these best practices to safeguard your Zoom meetings:
- Use Meeting Passwords: Set a password for all your Zoom meetings to restrict unauthorized access.
- Enable Waiting Rooms: Utilize the waiting room feature to control participant entry, allowing you to admit only approved attendees.
- Update Zoom Regularly: Keep your Zoom application up to date to benefit from the latest security enhancements and bug fixes.
- Restrict Screen Sharing: Limit screen sharing capabilities to hosts or specific participants to prevent unwanted interruptions.
- Educate Participants: Educate meeting participants on Zoom’s security features, such as muting, raising hands, and reporting issues.
- Monitor Participants: Regularly check the participant list during meetings to identify and remove any unauthorized individuals.
Conclusion
In conclusion, creating a Zoom account on your PC or laptop is a straightforward process that opens the door to a world of virtual communication and collaboration.
From the initial account setup to exploring advanced features, this comprehensive guide has equipped you with the knowledge to make the most out of your Zoom experience. As remote work and online interactions continue to shape the way we connect, having a reliable and secure video conferencing platform like Zoom is an invaluable asset. So, go ahead, create your Zoom account, and embark on a seamless journey of virtual meetings and collaborations.